
I am thrilled to share with you
our special make over project
Primitive Slant Top Desk
 I have been wanting a slant top desk forever.
Finding a vintage desk was next to impossible or affordable.
The only solution was to build one.
For many months we have been searching for the right
piece of wood, one with lots of patina.
Driving past my fav flea market I spotted this wood object
what was it, could it be, yes it was
an "old" oak table top
The table was almost square and pulled apart in the middle
no leaf and no legs...perfect
Price was perfect too...$25
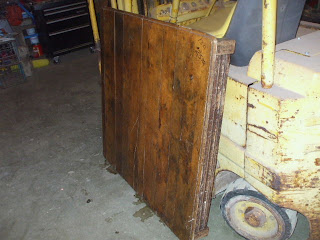 Table top waiting for the make over
 With Mr B's incredible talent the table top was transformed
into this slant top desk.
One half of the table was used for the desk top
the other half was used to form the bottom of the desk
 The sides of the table were used to make the sides of the desk
To maintain the correct slope for the slant
The end's of the desk had to be built up
See the neat design....
We added a back board from the other end of the table
Hinges are new but sandblasted then painted brown
The sweetest part....
The lid opens just like an old school desk
 Love the old wood patina, this could never be duplicated
lots of dings, scratches and history here.
Remember when I said there were no legs...
First we thought of 4x4's, too big
Second we purchased turned spindles, not the look
Finally decided the legs needed to be tapered.
Mr B was ready to build a jig to taper the 4x4's when
a light bulb went off in my head.
I remembered a sewing cabinet I had from the 70's (in 1970's)
I thought it had tapered legs....
trotted out to the other shed, found the cabinet, sure enough
dinged them a little...they are perfect
my slant top desk has sewing cabinet legs
Now the fun part
bringing the Desk to life

Primitive Bonnet and Tin Lunch Pail
 Leather covered books
Another Mr B creation
 School Picture Stitchery
In a one room schoolhouse
I learned my lessons well.
Reading, writing, arithmetic
As well as how to spell.
Hetta Dobson 1864
 Pewter Candle Stick
Make Do Ticking Doily
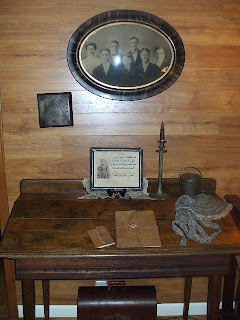
So Perfectly Primitive
44 inches in length
functional as well
What is under the desk, you ask
A vintage sewing machine with wood cover
I was trying to hide the modern plug in.

Thank you to my best friend
Thank you Mr.B
You are always so willing to
shower me with your talents.
You put a smile on my face
and warmth in my heart.
Life is a magical journey
I am proud to travel it with you.
Connie
our special make over project
Primitive Slant Top Desk

Finding a vintage desk was next to impossible or affordable.
The only solution was to build one.
For many months we have been searching for the right
piece of wood, one with lots of patina.
Driving past my fav flea market I spotted this wood object
what was it, could it be, yes it was
an "old" oak table top
The table was almost square and pulled apart in the middle
no leaf and no legs...perfect
Price was perfect too...$25


into this slant top desk.
One half of the table was used for the desk top
the other half was used to form the bottom of the desk

To maintain the correct slope for the slant
The end's of the desk had to be built up
See the neat design....
We added a back board from the other end of the table
Hinges are new but sandblasted then painted brown
The sweetest part....
The lid opens just like an old school desk

lots of dings, scratches and history here.
Remember when I said there were no legs...
First we thought of 4x4's, too big
Second we purchased turned spindles, not the look
Finally decided the legs needed to be tapered.
Mr B was ready to build a jig to taper the 4x4's when
a light bulb went off in my head.
I remembered a sewing cabinet I had from the 70's (in 1970's)
I thought it had tapered legs....
trotted out to the other shed, found the cabinet, sure enough
dinged them a little...they are perfect
my slant top desk has sewing cabinet legs
Now the fun part
bringing the Desk to life

Primitive Bonnet and Tin Lunch Pail

Another Mr B creation

In a one room schoolhouse
I learned my lessons well.
Reading, writing, arithmetic
As well as how to spell.
Hetta Dobson 1864

Make Do Ticking Doily

So Perfectly Primitive
44 inches in length
functional as well
What is under the desk, you ask
A vintage sewing machine with wood cover
I was trying to hide the modern plug in.

Thank you to my best friend
Thank you Mr.B
You are always so willing to
shower me with your talents.
You put a smile on my face
and warmth in my heart.
Life is a magical journey
I am proud to travel it with you.
Connie


